Ephesians: Armor of God
Ephesians 6:11 – Armor of God
Scripture Verse: “Put on the whole armor of God, that you may be able to stand against the wiles of the devil.”
Objectives:
1. Student should be able to name our adversary -- Satan or the devil
2. Student should be able to name the pieces of armor for battle.
3. Older students should recite the verse.
Possible Lesson Plan:
1. Open with prayer. Find the city of Ephesus on the map.
2. Discuss with the students the enemy -- the devil -- how Lucifer, the brightest of the angels, was thrown out of heaven by the armies of God for daring to claim he was as great as God. Discuss briefly (don't scare the children!) his sneaky ways in tempting us to disobey God. This would be a good time to review the stories of Adam and Eve, the tower of Babel, Jonah and the "whale", as well as Judas Iscariot and the betrayal of Jesus. All of these are in your children’s Bibles. Remind the children that Jesus has already defeated the devil with the resurrection, but that we must stand strong against his temptations with the weapons Jesus has given us.
3. Discuss the pieces of a knight's armor; a picture of a knight with a helmet, shield, breastplate, etc. would be great! (There are lots of pictures in a vast array of library books). Discuss what part of the body each protects and why.
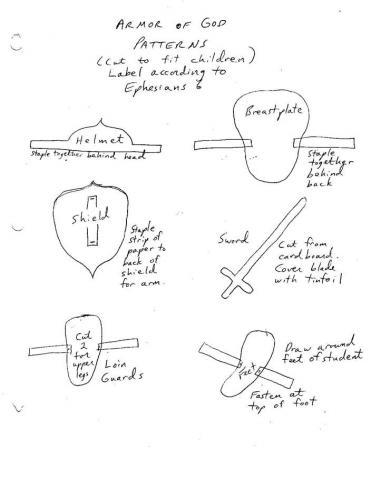
4. Discuss the armor of God -- what does each piece mean? Loins of Truth, Breastplate of Righteousness, Shoes of Peace, Shield of Faith, Helmet of Salvation, Sword of the Spirit
5. Do the Armor of God craft. Have the pieces cut ahead of time and ready to tape onto children. Then march like soldiers!
Too time-consuming? Or not enough space? Then try the paper dolls. Print the boy or girl on cardstock and the armor pieces on regular paper. Color both and cut out armor. Glue to girl or boy to make a nice take-home.


Not into paper dolls? Then consider the Armor of God necklace. Print on cardstock, or shrinky-dink plastic sheets; if using shrinky-dink, be sure to upsize the picture file to a half page since they will shrink. Color (use Sharpies or colored pencils if shrinking) and cut out. Punch hole in each. If using Shrinky-dink paper, place on parchment paper on a cookie sheet, marking each section with child’s name, and follow shrinky directions; it should take about 5 minutes in the oven. Be sure to give them a little flattening by hand as they come out of the oven. Then use yarn or string and pony beads to make a nice necklace.

Not much interest in jewelry or paper dolls? How about turtles for animal lovers? The Lord gave the turtle some armor already; we can give it some more with names from the Epistle. The Romans, rulers of the world in the days of Paul who wrote the letter to the Ephesians, used the "turtle" by putting their shields together in a group like the upper shell of the turtle to protect the whole group from flying spears. You can make an Armor of God Turtle simply by printing the two pages on cardstock, cutting out, and using tape, glue, or staples to hold the top shell and the bottom shell together
Or use a plate or bowl for top shell and plate for bottom shell. Color or decorate -- so many ways! Squares of paper, buttons, tissue paper, or just crayons and markers. Print head, feet, and tail on cardstock or just cut from construction paper. Cut out and color. Use another plate for the bottom shell, perhaps a different color. Glue or staple body parts between the two shells. Then glue on the pieces of armor in the correct spot.


6. Close with prayer.